how to create a public photo uploader using flickr ?
There are many instances where you will need to create a photo uploader on your website so that anyone or a selective audience can upload their photos to a common pool. In this post, I will explain to you how we can create such a photo uploader using Flickr.
Obsolete
This blog post is obsolete as of Jan 2019. Please refer to Flickr APIs instead.
Finished product
At the end of this post, you would have learnt to build a Public Photo Uploader using Flickr.
Create a Flickr account
You can login to Flickr via Yahoo! or Google or Facebook ID. You can signup with flickr @ Create Flickr Account. I would recommend you to create a Yahoo! user account as Flickr is owned by Yahoo!.
I created a Yahoo! account named rkj_photo_uploader@yahoo.com. Now, let us sign into flickr @ Flickr Sign In. Now flickr will ask you to create a Flickr username to associate with your account. This is different than your Yahoo! account. Let us choose rkj_flickr as the flickr username. If everything succeeds, congratulations!!! you created a new Flickr account.
Create a Flickr application
You can browse your flickr apps @ Flickr Apps. Follow the below steps to create a new flickr app:-
Create a new non-commercial app @ http://www.flickr.com/services/apps/create/noncommercial/.
Fill in the name of your app and description and create the app.
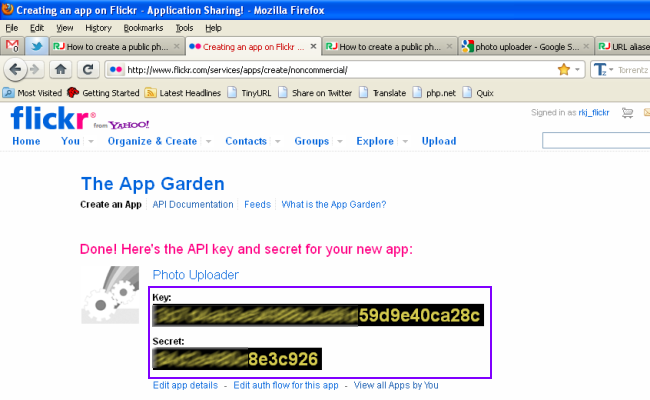
Once you do this, you will get a screen like below which specifies the "API Key" and "Secret" for your application. Please note both of them in a text file which will be later used in our photo uploader.
Flickr API
You can browse the Flickr API documentation @ http://www.flickr.com/services/api/. Either, you can use the Flickr API directly to build the Photo Uploader or we can use phpFlickr which is basically a php wrapper on top of Flickr API which does all the stuff like making curl call, passing required params, error handling etc. Due to these advantages, we will use phpFlickr library to access Flickr API.
You can download phpFlickr library at phpFlickr - github. In order to run phpFlickr, you will need to install php and curl libraries. If you don't have them, refer to Setup PHP cURL on Ubuntu to setup php and curl on your webserver.
Clone or extract the compressed file of phpFlickr library on your webserver. The next step is the most critical part of getting your photo uploader working.
Generate API token
Basically, when someone uploads a photo using your photo uploader, we somehow need to figure out a way to send this photo to flickr, but this process needs authentication. So, in order to let anyone upload photo to your flickr stream, we will need to generate a API token and hard-code it our code so that we will authenticate on the uploader's behalf.
In the phpFlickr library, you will find "getToken.php" whose content are as below.
We will slightly modify the above code to suit our needs. In the modified getToken.php below, make the following changes to customize it to your app :-
Replace the "__your__app__apikey__" and "__your__app__secret__" with those which you noted down after you created the flickr app.
Since you want to upload photos to your flickr photo stream, you will need "write" permission.
Also, if the user has not yet authenticated, $_GET["frob"] will be empty. Before a user can use the app, he/she needs to request a "frob" and generate a token from the frob.
Once you have the frob, use "$f->auth_getToken($_GET['frob'])" to generate the token.
var_dump just prints out the $tokenArgs variable.
I know this part can be a little confusing, just think of this process as getting a precious "token" which will magically enable anyone to upload photos to your flickr photo stream.
Edit Authentication flow
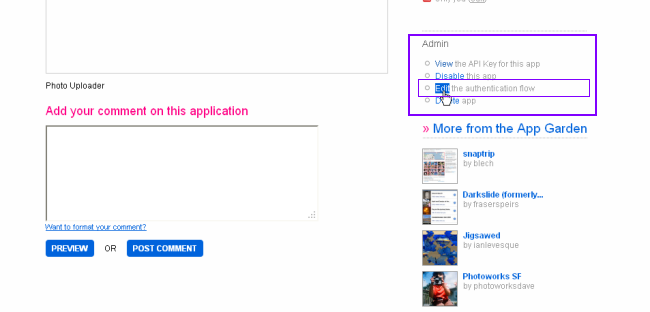
Before you can execute the above modified getToken.php file, you will need to make some changes to your flickr app. Go to your app in flickr and click on "Edit the authentication flow".
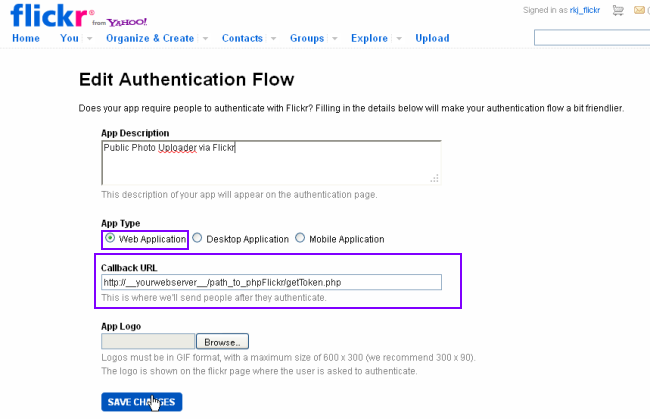
Choose Web Application as App Type and enter the callback url as the path to "getToken.php" on your webserver. This is the webpage url where flickr will redirect you after authentication is done.
Authorize the app
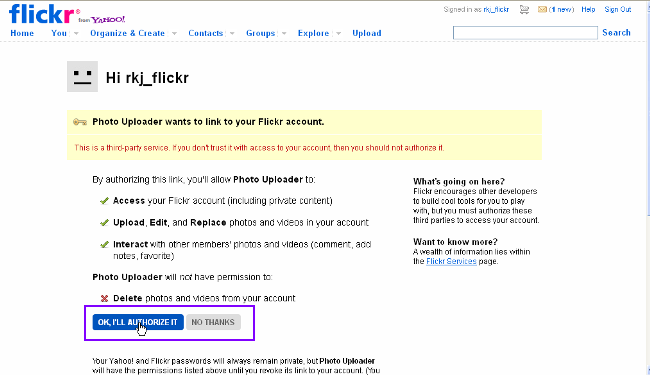
Now, in the browser, hit getToken.php i.e, http://__yourwebserver__/__path_to_phpFlickr__/getToken.php. If you have not logged in with the account to which photos need to be uploaded, do that. After logging in, an authorization screen is shown, click "Ok, I'll authorize it".
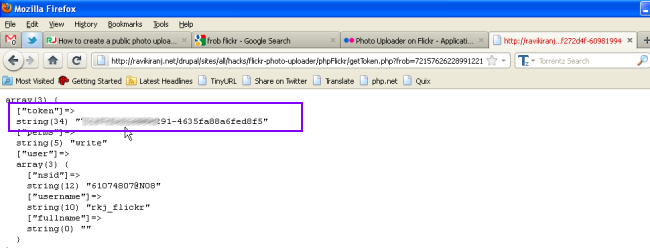
Finally, generate the token and store it
After, the above is done, you will see an output of tokenArgs as below. The most important part is the "token", which you will need to copy and store it safely in a text file, which will be used later.
PHP Logic to upload a file to webserver and then to flickr
Now that you have the API Key, Secret and Token, it's just a matter of building a basic file uploader on your website. Whenever a user uploads a file, we will upload it to a temp directory on your webserver and then post it to flickr with above credentials.
If you want to learn basics of file uploading via PHP, please refer to http://php.net/manual/en/reserved.variables.files.php and http://www.php.net/manual/en/features.file-upload.post-method.php for more details. I will assume that you know how to deal with file uploading in PHP and go ahead with the flow.
Some more minor details to cover while implementing a photo uploader are listed below.
Restrict file-type to "jpeg", "jpg", "gif", "png".
Restrict file-size so that people don't upload big files of 2-3MB. In my case, I will restrict it to "512KB".
In the below code, once file uploading is done, we call the function "uploadPhoto". Here, we basically instantiate a phpFlickr object through our apiKey and secret.
The next step is critical, we need to assign the token generated previously to this object using $f->setToken($token). You can upload the file now by calling, $f->async_upload($path, $title), which returns a ticket_id through which you can track your upload.
There is one more method that you can use to upload a photo to flickr via phpFlickr, namely, $f->sync_upload() which basically waits until Flickr processes the photo and returns the photo ID. You can find more details about these two methods of uploading at https://github.com/dan-coulter/phpflickr/blob/master/README.md.
Now that we have the php part of the code working, let's weave HTML around it so that user can upload his photo and get confirmation. We will also do some basic error handling by embedding some PHP code.
If you append both the logic given above, you have a public photo uploader ready. Whenever, anyone uploads the photo, it directly goes to your flickr stream.
Complete Source Code : https://github.com/ravikiranj/flickr-photo-uploader
Notes
If you get a open_basedir restriction error or unable to include file error in php, please refer to set_include_path and php.ini help to resolve this issue.
Comments
Comments powered by Disqus